Garrattfan's Modelrailroading Pages
NS 6200 class
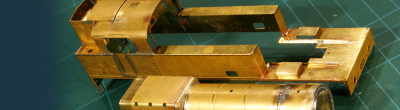
Assembly of the chassis
 |
I had already painted the chassis and wheels black. For display reasons I had part assembled the chassis to show the project's progress.
First I mounted the Philotrain plate which I had prepared in an earlier stage. |
|
 |
After the glue had set I took the chassis apart | |
 |
and gave it a protective clear dull coat. The difference with the previous photo may not be apperent but.... | |
 |
... this photo shows that the cylinder block has obtained a nice semi-gloss sheen (despite being called dull ;-) | |
 |
During disassembly of the BR93 one return rod had come loose. The eye of the expension link had opened and the rivet had come out. Now is the time to restore that.
On close inspection I found residues of CA glue on the rivet so there has been a repair before. I gave it a hard thought if I could mend that with a bit of epoxy glue which would have been a most permanent solution, but in the end I decided to use CA for its capilary action. |
|
 |
So one small drop for men but one giant heap for train kind solved the problem.
So I thought. During the assembly steps of the chassis see next page) it immediately parted again. Long story short: in the end I applied epoxy glue on the backend of the rivet. That was the firm and definitive solution. |
|
Now the bottom side of the chassis could be assembled. The video shows the order of things.
|
||
The frame was turned and checked for free running. I had to do some minor rework, the gear would not run freely because of some obstruction by the new paint on the gear axles. On the photo above all the parts for the upside are on display
|
||
The second video shows the order of assembly of the upper part of the chassis
|
||
Finally a test run was made. Initially it would not run but after some corrective action this was the result: |
||
While trial fitting the almost completed superstructure on the chassis I heard a click . I immediately thought "Oopsy, not good". After that the superstructure would not come off the chassis again. After much pain, sweat and an extra hour I managed to get it off again. I found that the weight and the circuit board were a tad too long and snapped behind a hidden ridge in the superstructure's internals. |
||
 |
I made some emergency alterations. The circuitboard was cut back to the shortest possible dimension by "cutting the corners". |
|
 |
I also filed the front of the weight a few millimeters back
After that the superstructure got on and off reasonably easy |
|


Sign my
GuestBook